Smoked Turkey with Crispy Skin: The High-Heat 'Dry Brine' Method
🔥 Big B’s Quick Hits (TL;DR)
- The Spatchcock Method: Butterfly your bird to solve the dark-meat-vs-white-meat timing issue and expose more skin.
- Dry Brine and Air Dry: Salt it 24-48 hours in advance and leave it uncovered in the fridge. Wet brines are the enemy of crispiness.
- Mandatory High Heat: Smoke at 325°F (163°C). Lower temps like 225°F (107°C) will never render the fat under the skin correctly.
- Mayo Slather Binder: A thin coat of mayonnaise promotes the Maillard reaction for a deep, golden mahogany crunch.

The Crunch You Can Hear
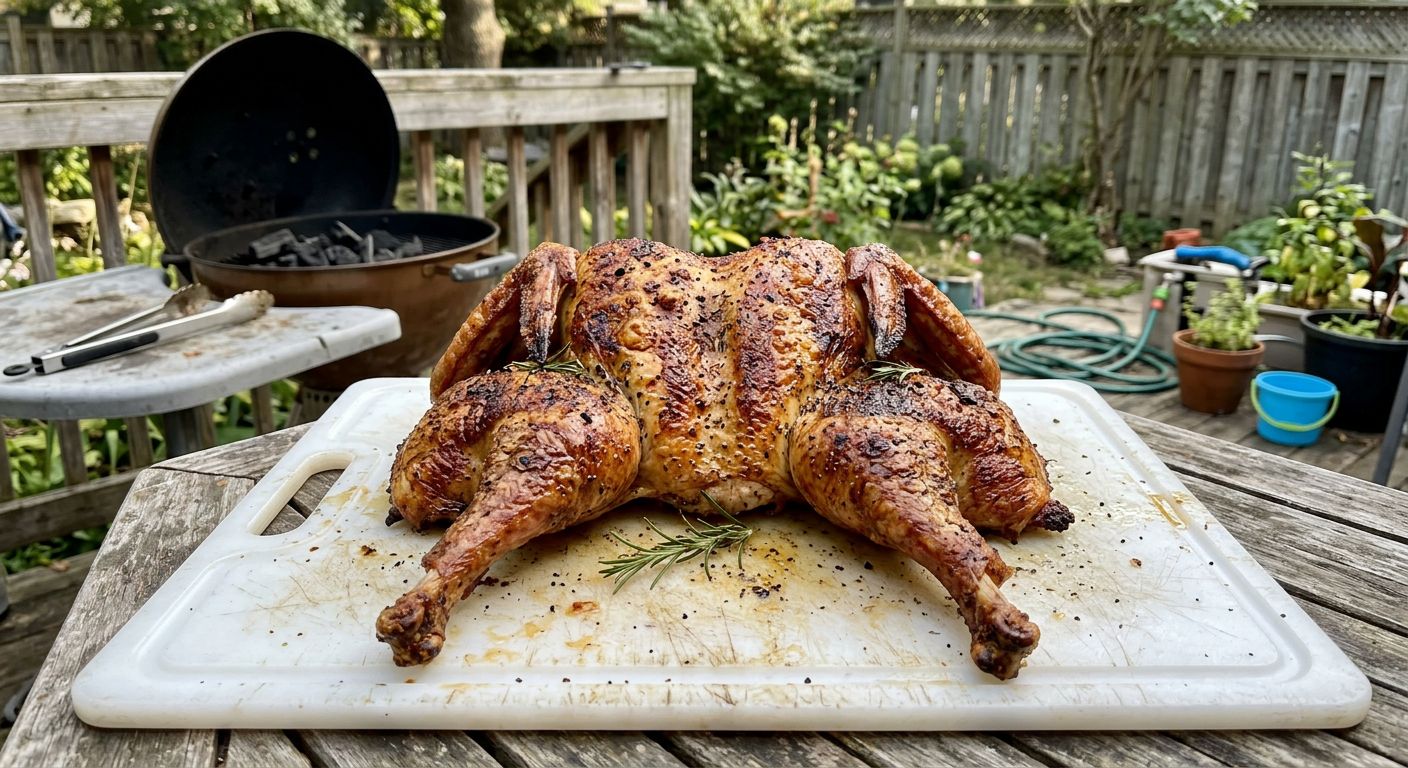
There’s nothing worse than pulling a beautiful-looking turkey off the smoker, taking that first bite, and realizing the skin has the texture of a wet paper towel. You spent twelve hours tending the fire, you used the fancy wood, and yet the most important part—that salty, crispy skin—is a total bust. It’s a sensory disappointment that can ruin a holiday meal faster than a dry breast.
I’ve been there. I’ve ruined more Thanksgiving birds than I care to admit, mostly by following the old-school “low and slow” dogma that works so well for brisket. But here’s the cold, hard truth: turkey is not brisket. It doesn’t have that massive internal fat or heavy connective tissue that needs a 12-hour crawl to melt. What it does have is a layer of subcutaneous fat under the skin that needs to be rendered out.
If you don’t give that fat the heat it needs to melt, you’re just steaming the skin from the inside out. Instead of a golden, glass-like crunch, you get a rubbery, chewy mess that you end up peeling off and tossing in the trash. It’s a waste of the best part of the bird, and frankly, it’s unnecessary.
After years of trial and error at the pit, I finally found the combination that works. It’s about more than just cranking the temperature. It’s a multi-day process of preparation that starts with a dry brine and ends with a high-heat finish. We’re going to walk through every step to ensure your next bird is the one people are still talking about next year.
Step 1: The Spatchcock Advantage
If you want a turkey that cooks evenly and has crispy skin across the entire bird, you have to spatchcock it. To spatchcock a turkey, you use heavy-duty kitchen shears to cut out the backbone and then press down on the breastbone until the bird lies flat. It’s often called butterflying, and it’s a game-changer for anything larger than a standard chicken.
Why bother? When you smoke a whole turkey the traditional way, the legs and thighs are tucked away and shaded from the heat, while the breast is out in the open. This means the breast meat is often at a safe temperature long before the dark meat is tender. By the time your thighs are ready, the white meat is about as exciting as a piece of dry cardboard. Spatchcocking levels the playing field, ensuring both dark and white meat finish at roughly the same time.

Beyond just the even cook, flattening the turkey also maximizes the surface area of the skin exposed to the heat. In a whole bird, the skin on the bottom and in the crevices is shielded, meaning it stays soft and soggy. When it’s spatchcocked, every square inch of that skin is facing the hot, moving air of your smoker. This is the foundation of the crunch. You’re giving the heat a clear path to render the fat and dry out the surface.
Don’t let the prep intimidate you. It only takes about five minutes with a good pair of poultry shears. You just cut along both sides of the backbone, lift it out (save it for stock!), and then flip the bird over and give it a firm press on the breastbone until you hear a crack. It’s a simple mechanical change that dramatically improves the final product.
Step 2: The Dry Brine and the Fridge Chill
Most folks swear by a wet brine, soaking their turkey in a bucket of salt water overnight. While that can keep the meat moist, it’s the absolute enemy of crispy skin. You’re literally hydrating the skin before you try to dry it out. Think about it: how can you get a crunch when you’ve been soaking the surface in liquid for 12 hours?
The real secret is the dry brine. 24 to 48 hours before you plan to smoke, generously salt the turkey on both sides. Don’t be shy with the salt; get it into every nook and cranny, and even peel back the skin slightly to salt the meat directly under the breast and thighs. This starts the process of osmosis, where the salt pulls moisture out of the meat, dissolves into a brine, and then gets reabsorbed back into the muscle fibers, seasoning it deep inside.
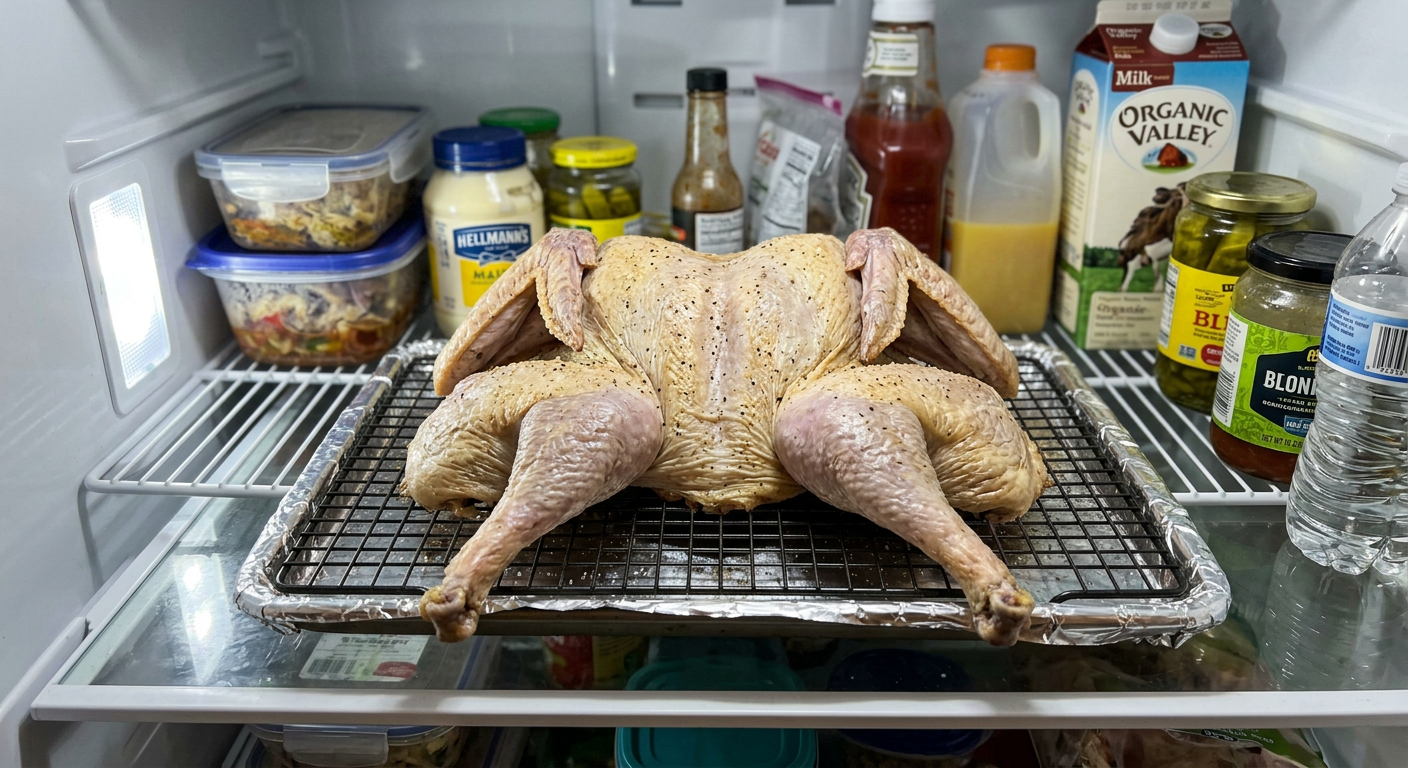
Once salted, put the turkey on a wire rack on a baking sheet and slide it into the fridge. Now, the most important part: leave it uncovered. This air-drying process is absolutely critical. It creates a pellicle—a thin, tacky layer on the surface that acts like a primer for smoke and heat. After 24 to 48 hours in the fridge, the skin will look tight, dry, and almost like parchment paper. That’s exactly what you want.
When you pull that bird out of the fridge, it might not look like much, but you’ve already won half the battle. You’ve seasoned the meat all the way to the bone, and you’ve primed the skin to transform into a golden-brown crust the second it hits the hot air of the smoker. If you skip this air-drying step, you’re just fighting an uphill battle for crunch.
Step 3: The Secret Slather
Before you put your dry rub on, you need a binder. Most people use mustard for their brisket, but for turkey, I’m a big fan of the mayo slather. Mayo is mostly oil and egg yolk. The oil helps to conduct heat to the skin, while the proteins in the egg yolk promote the Maillard reaction—the chemical reaction between amino acids and reducing sugars that gives browned food its distinctive flavor.
A very thin, even layer of mayonnaise on the skin acts like a turbocharger for browning. Don’t worry, you won’t taste it. The flavor of the mayo is subtle enough that it gets lost in the background once the smoke and heat do their work. What’s left behind is a deep, mahogany color and a crisp, cracker-like texture that you just can’t get with water-based binders.
If the thought of mayo on your turkey makes you squeamish, a light coating of olive or avocado oil will do the trick too. But the extra protein in the egg yolk is the key that really makes that skin pop. I’ve tried both, and the mayo-slathered bird consistently has a more uniform, professional-looking color. It’s a little trick that separates the amateurs from the pitmasters.
Once your slather is on, apply your dry rub. You want something with a bit of sugar and some bold herbs like sage, thyme, and rosemary. The sugar will caramelize along with the mayo, creating a savory-sweet crust that’s to die for. Just keep the layer thin—don’t gloop it on. We want to enhance the skin, not bury it in a heavy paste.
Fire Management: Cranking the Dial
The most common mistake people make is smoking their turkey at 225°F (107°C). That temperature is perfect for a brisket, but it’s not enough to render the fat under turkey skin. To get it right, you need to crank your smoker up to 325°F (163°C). At this higher heat, the fat actually liquifies and fries the skin from the inside out, while the moving air of the smoker dries it from the outside.
Think of your smoker more like a high-powered convection oven during this phase. At 325°F (163°C), the air is moving faster and carrying more energy. This rapid heat transfer is what triggers that Maillard reaction we talked about. If you stay at 225°F (107°C), you’re just gently warming the bird, which might keep the meat moist but will leave you with that dreaded rubbery skin.
Wood choice is also a factor. Since we’re cooking at a higher heat, you don’t need a heavy hitter like mesquite. Post Oak is a fantastic choice for poultry because it provides a clean, golden smoke that doesn’t overpower the delicate meat. You can check out my Post Oak Guide for more tips on managing your fire for a clean, blue smoke burn. A blend of oak and a little apple or cherry wood can also give the bird a beautiful, bright color.
Don’t be afraid of the higher temperature. Your meat won’t dry out if you’ve done the dry brine correctly, and the skin will thank you. Just keep an eye on your vents and make sure you have a good, clean fire. If you see thick, white smoke, your wood is smoldering instead of burning—and that will lead to a bitter taste that no amount of crispy skin can save.
The Pull and the Rest: Don’t Ruin It Now
You’ve done the work, you’ve hit the temps, and your bird looks like a golden masterpiece. Now, don’t throw it all away by pulling it at the wrong time. A common misconception is that you need to cook a turkey until the breast hits 165°F (74°C). If you wait that long, you’re in for a dry bird. Instead, pull the turkey when the internal temperature of the thickest part of the breast reaches 160°F (71°C).
The residual heat in the meat will continue to cook the turkey as it rests on the counter, a process called carryover cooking. By the time it’s ready to carve, the breast will be at a perfect 165°F (74°C)—juicy and tender. Pull it at 165°F, and you’ll be carving a bird that’s already on its way to being overdone.
But the most important part of the rest is to not cover the turkey. I see people all the time tenting their beautiful bird in aluminum foil to “keep it warm.” Don’t do it! All that foil does is trap the steam coming off the meat. That steam will immediately soften the skin you worked so hard to crisp, turning it back into a soggy, chewy mess in minutes.
Instead, just let the turkey sit on the cutting board uncovered for 20-30 minutes before you start slicing. This gives the juices a chance to redistribute so they don’t all run out on the board, and it allows the skin to stay crisp and tight. I promise, the turkey won’t get cold that fast. It’s built for this. Once the rest is over, you’re ready to carve the best bird you’ve ever tasted.
The Thanksgiving Transformation
I know it can feel like a lot of extra steps. You’re taking a process that used to be simple—thawing, stuffing, and roasting—and turning it into a three-day project. But let me tell you, when you take that first bite of a bird that’s as juicy as a ribeye and as crispy as a piece of fried chicken, you’ll never look back.
This isn’t just about Thanksgiving. These techniques work for a weekend dinner, a summer cookout, or even just a midweek roast chicken. Once you understand the principles—the spatchcock, the dry brine, the high-heat finish—you’ve got a roadmap for perfect poultry every single time.
Don’t be afraid of the change. It’s a journey, and you’re going to learn something new with every cook. So get out there, fire up the pit, and let me know how it goes. Your family and friends will be thanking you for the best bird they’ve ever had.
Keep it simple, keep it hot, and keep that skin crisp. I’ll see you at the pit.
Keep the Fire Burning
The Poultry Brine Bible: Wet, Dry, and Why It Matters
Master the science of moisture retention. Learn when to use a wet brine for juiciness and when a dry brine is mandatory for crispy skin.
Read GuideSpatchcock Smoked Chicken: No More Rubbery Skin
The best technique for flattening a bird for even cooking, maximum smoke exposure, and crispy skin.
Read Guide