The Fire Within: Master Charcoal Management in Your Kettle
🔥 Big B’s Quick Hits (TL;DR)
- Briquettes for Consistency: Use them for long low-and-slow cooks where stable temps are king.
- Lump for High Heat: Best for searing steaks when you need that “jet engine” fire.
- Bottom Vent = Gas Pedal: Controls how much oxygen gets into the fire.
- Top Vent = Exhaust: Controls how much heat and smoke stay inside the dome.
- Never Use Lighter Fluid: It’s a chemical sin that will haunt your meat for years.
The Heart of the Backyard
If you’ve ever stood over a Kettle Grill at three in the afternoon, sweating through your shirt while the temperature gauge does a jittery dance between “cold” and “cremate,” you’re not alone. We’ve all been there. Most folks treat charcoal like a wild animal they’re trying to keep in a cage. But once you understand the physics of the burn, you stop reacting to the fire and start commanding it. Charcoal isn’t just fuel; it’s the heartbeat of your cook. Whether you’re looking for a screaming hot sear or a gentle, twelve-hour whisper of smoke, it all comes down to how you manage your coals and your air.
The Soul of the Fire: Briquettes vs. Lump Charcoal
The very first choice you make as a pitmaster is what kind of fuel to dump into your Chimney Starter. You’ve got two main camps: Briquettes and Lump Charcoal. If you’re just grabbing whatever is on sale at the big-box store, you’re missing half the strategy.
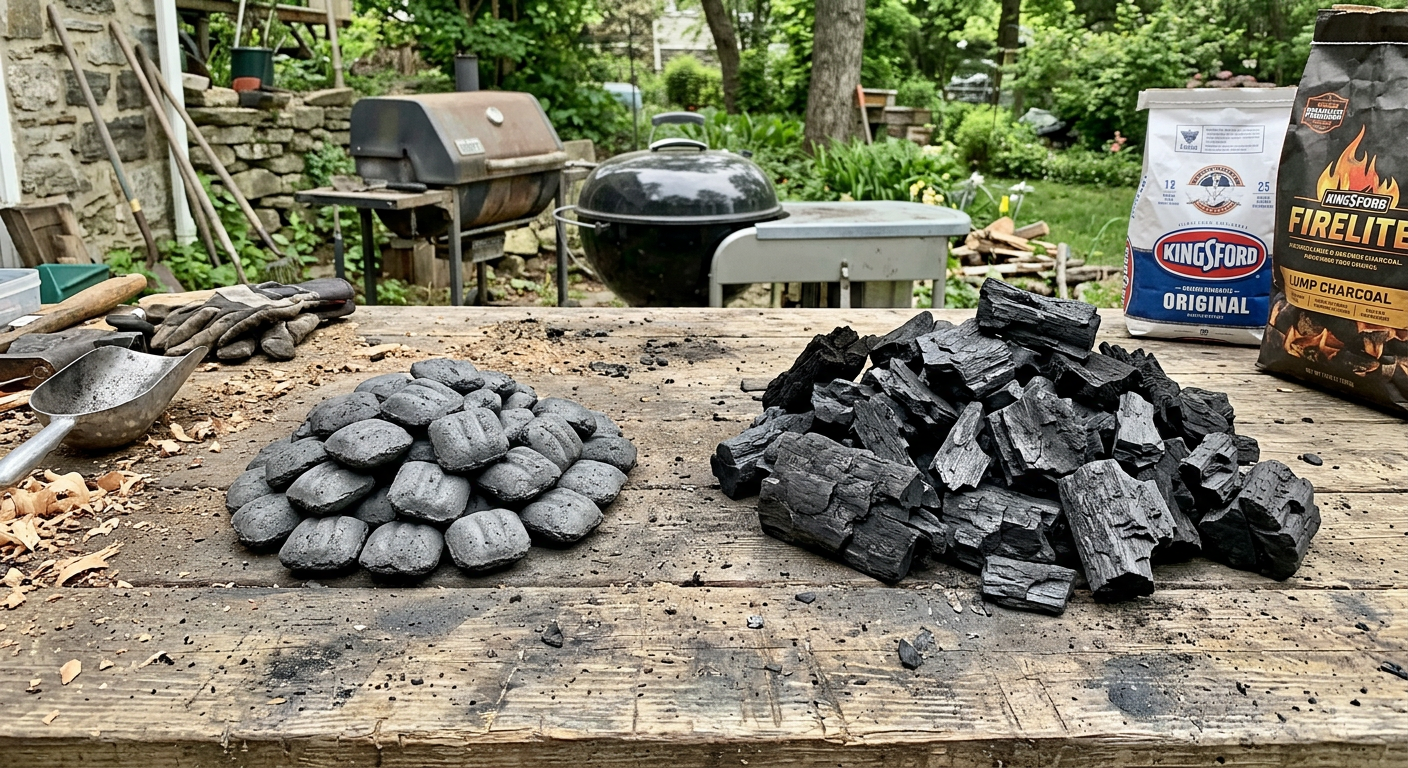
Briquettes are the reliable workhorse of the backyard. They’re compressed blocks of carbonized wood and sawdust, held together by natural binders like starch. Because they’re all the same size and shape, they burn with a predictability that’s hard to beat. When you need a steady 225°F (107°C) for eight hours of smoking overnight pork butt, briquettes are your best friend. They won’t surprise you with sudden temperature spikes or dead spots.
On the other hand, Lump Charcoal is the high-octane racing fuel of the BBQ world. It’s literal chunks of wood that have been roasted in a kiln until only the carbon remains. No binders, no additives. It burns hotter, faster, and cleaner than briquettes. If you’re reverse searing a ribeye and you need that “jet engine” heat to get a perfect mahogany crust in sixty seconds, lump is what you want. Just be ready to stay active with your vents, as those irregular chunks can be a bit more temperamental.
Lighting the Fuse: The Chimney Starter Method
If you take one thing away from this guide, let it be this: throw your lighter fluid in the trash. It’s a chemical cocktail that has no business being near your food. When you use that stuff, you’re not just lighting a fire; you’re seasoning your meat with petroleum. You’ll taste it in the bark, and you’ll smell it for hours.
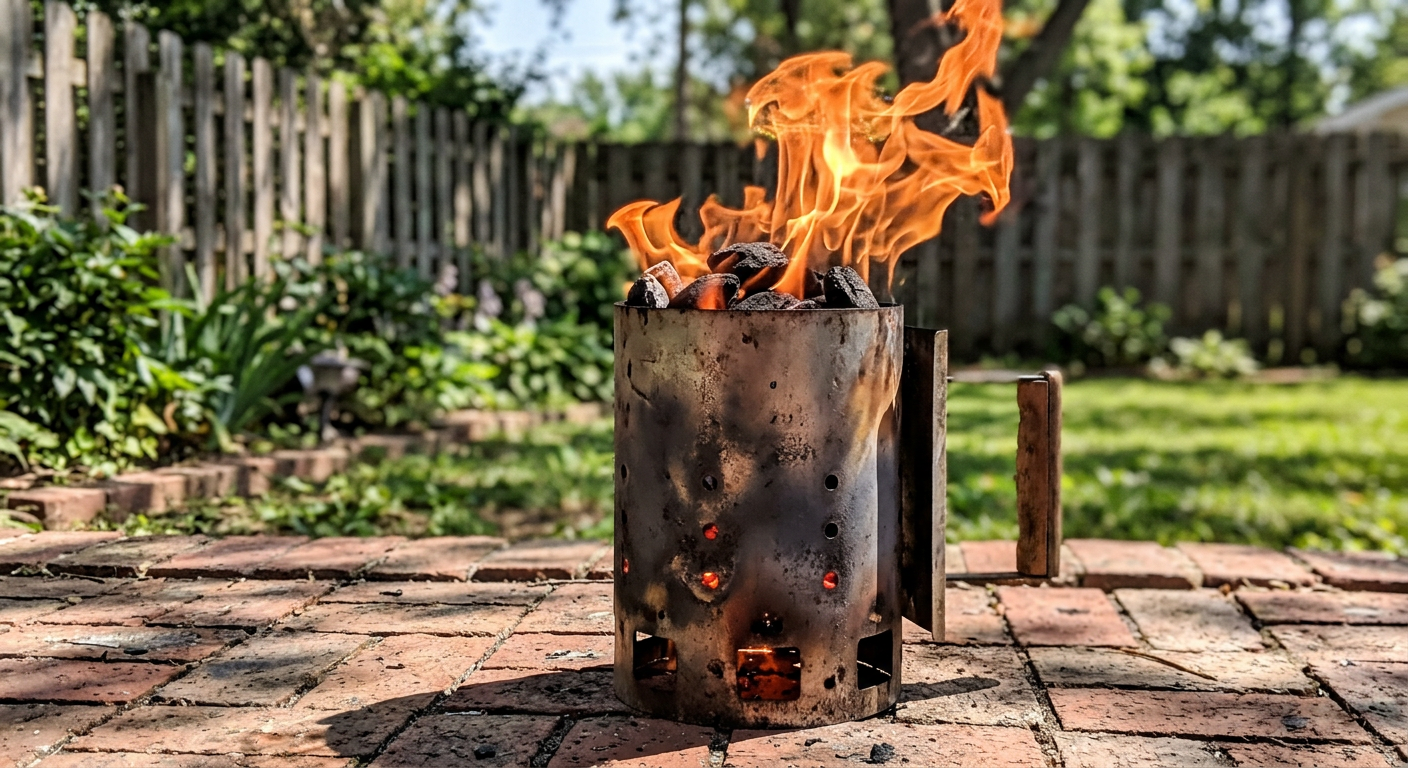
The only tool you need is a Chimney Starter. It’s a simple metal cylinder that uses basic physics to get your coals roaring in fifteen minutes. You stuff a couple of pieces of crumpled newspaper or a paraffin wax cube in the bottom, fill the top with your charcoal, and light the paper. The chimney effect draws air up through the coals, lighting them from the bottom up.
You’ll know they’re ready when the coals at the very top are starting to “ash over”—meaning they’ve got a thin layer of gray ash on them and you can see a glow deep inside the cylinder. At that point, you’re ready to dump them into the grill and set up your zones. It’s clean, it’s fast, and it doesn’t leave your backyard smelling like a gas station.
Setting the Stage: Charcoal Arrangements
Once your coals are lit, you don’t just dump them in a heap and hope for the best. The way you arrange your charcoal determines how the heat moves through the grill.
Two-Zone Cooking (The Foundation)
This is the bread and butter of backyard grilling. You bank all your hot coals to one side of the grill, leaving the other side empty. This gives you a “hot zone” for direct searing and a “cool zone” (indirect heat) for roasting. It’s the essential setup for a reverse sear ribeye. If your meat starts to flare up or char too fast, you just slide it over to the cool side. It’s your safety net.
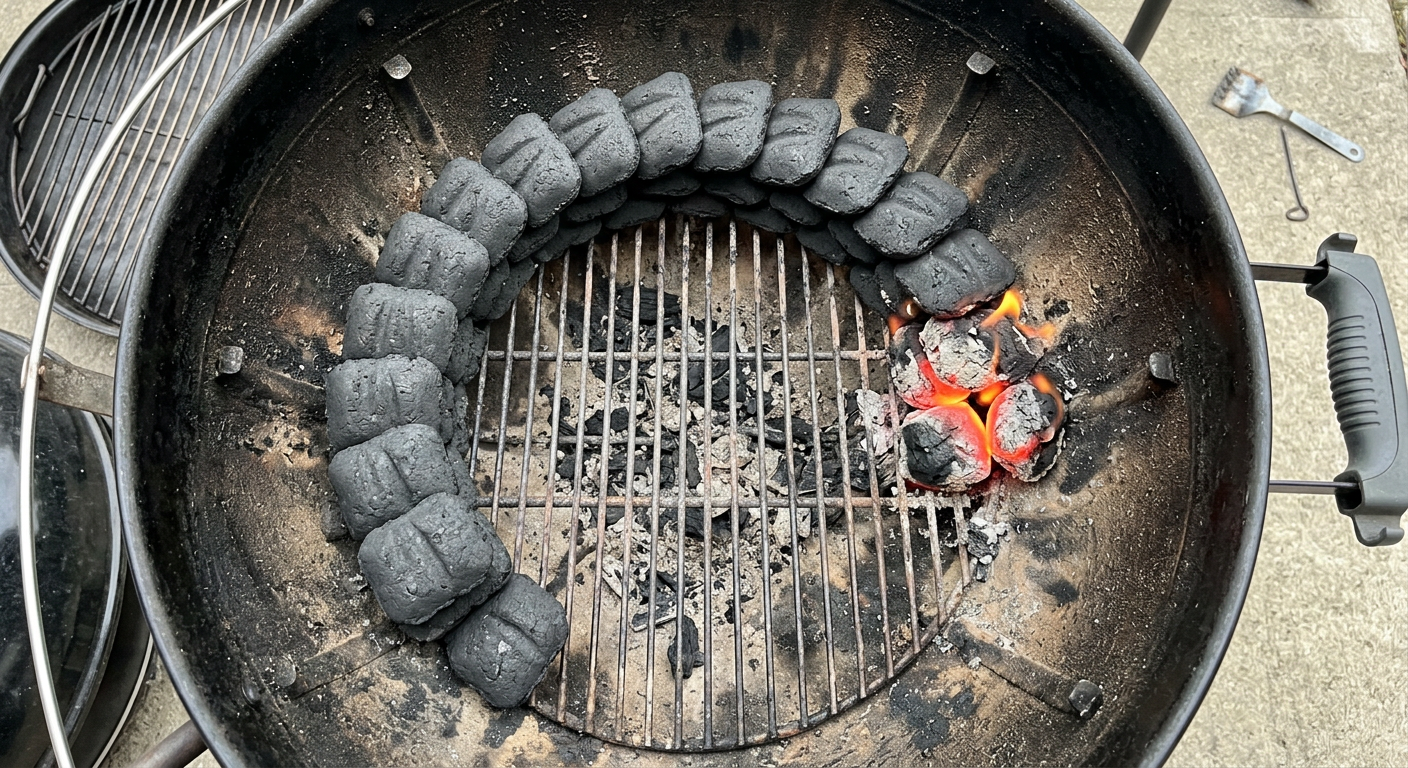
The Snake Method (The Marathon)
When you’re settling in for a long smoke—like a smoked brisket—you use the Snake Method. You lay out unlit briquettes in a semi-circle around the edge of the charcoal grate, two wide and two high. Then, you place a few hot coals at one end of the “snake.” As those coals burn, they gradually ignite the unlit ones next to them, creating a slow-moving fuse that can maintain a steady 225°F (107°C) for twelve hours or more without you ever having to open the lid.
The Minion Method
The Minion Method is the middle ground. You fill your charcoal basket or a pile in the center with unlit briquettes and then dump a small amount of hot coals right on top. The fire burns from the top down, slowly catching the unlit fuel below. It’s great for medium-length cooks where you need a bit more heat than the snake but still want to avoid constant refilling.
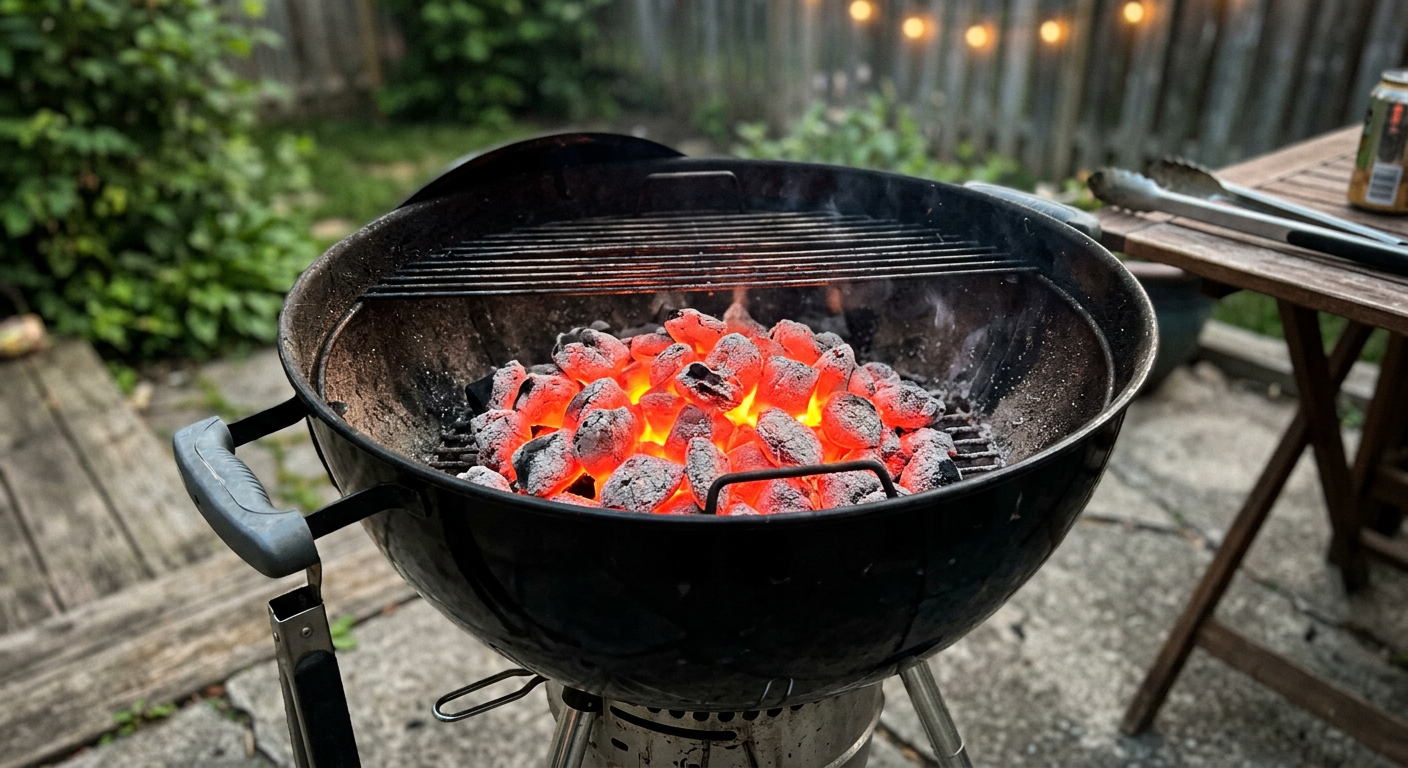
Taming the Beast: Vent Control and Airflow
If your charcoal is the fuel, then oxygen is the gas pedal. On a standard kettle, you’ve got two sets of vents: the intake at the bottom and the exhaust on the lid. Managing the airflow between these two is the secret to hitting your target temperature and staying there.
Think of the bottom vent as your coarse adjustment. If you want more heat, you open it up to let more oxygen feed the fire. If you’re running too hot, you close it down to choke the fire back. The top vent is your fine-tuning. It controls how much heat and smoke are pulled out of the grill. You almost never want to close the top vent completely while you’re cooking, or you’ll trap stale, bitter smoke inside and end up with creosote on your meat.
The goal is to find that sweet spot where you have a steady “draw”—clean air coming in the bottom and a thin, nearly invisible stream of blue smoke exiting the top. If you see thick, billowy white smoke (what we call dirty smoke), your fire is struggling for air. Open those vents, let it breathe, and wait for the smoke to clear before you put your meat on.
Troubleshooting the Burn
No matter how well you plan, the fire has a mind of its own. Environmental factors like wind, humidity, and outside temperature all play a role. If you see your temperature spiking, don’t panic and close all the vents at once. That’s a rookie mistake that will kill your fire completely. Instead, close the bottom vent halfway and wait ten minutes. Temperature changes on a kettle are slow; you have to give it time to react.
If your fire is dying, it’s usually one of two things: lack of oxygen or ash buildup. If your bottom vents are open but the temp is dropping, take a metal rod or the grill’s cleaning lever and give the charcoal grate a few shakes. This clears out the fine ash that’s choking the coals. If that doesn’t work, you might just need more fuel. Use your tongs to tuck a few unlit briquettes against the ones that are still glowing.
The most important skill you can learn is to “catch the temp” on the way up. If you want to cook at 250°F (121°C), start closing your vents down when the grill hits 225°F (107°C). It’s much easier to stabilize a rising temperature than it is to bring a runaway fire back down from 400°F (204°C). Master the coals, and you master the cook.
Keep the Fire Burning
The Poultry Brine Bible: Wet, Dry, and Why It Matters
Master the science of moisture retention. Learn when to use a wet brine for juiciness and when a dry brine is mandatory for crispy skin.
Read GuideThe Science of the Pellicle: Why Your Smoked Salmon Needs to be "Tacky"
Stop guessing if your salmon is ready for the smoker. Big B explains the science of the pellicle, why it's the secret to smoke adhesion, and how to get that perfect "tacky" finish every time.
Read GuideThe Foil Boat Strategy: Why Your Brisket Bark Deserves to Breathe
The middle ground between wrapping and going naked. Big B explains the foil boat technique, why it saves your bark, and exactly when to deploy it for the perfect brisket and pork shoulder.
Read Guide